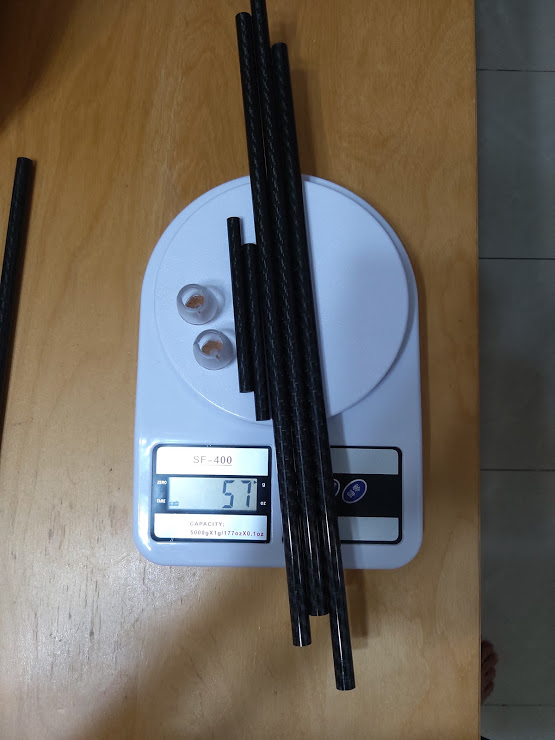
天幕杆我用兩米左右既,平時唔用副杆都幾夠空間,若果有埋副杆當然空間會更好用。
另外,三峰山景前廳如果全開,都要多兩枝杆,而因為山景主杆只係一米鬆啲,另外兩枝當然亦不能太長,所以我又多個原因做多兩枝短少少既碳纖杆。
副杆幼啲無問題,所以索性同山景/藍山 2 一樣粗幼就夠。為咗盡用材料,我造 1.5 米高。
每枝 93g...
山景內帳 530g
銀面天幕做外帳 700g
主 pole 300g 其中一枝係行山杖
副杆 200g
成套頹頹地已經有埋細天幕...
Showing posts with label diy. Show all posts
Saturday, June 13, 2020
Thursday, February 27, 2020
DIY Carbon Pole for 3F Lanshan 2 Tent
I made one myself, the weight of the major raw materials:
Finished product, first generation:
It was first tested in 長咀 and the wind was exceptionally strong! So, it's well tested in the first time!
After initial testing, I further enhance it later like this with scratch parts at home:
It should be better for fixing on the land, and better protecting the tent on top.
Finished product, first generation:
It was first tested in 長咀 and the wind was exceptionally strong! So, it's well tested in the first time!
After initial testing, I further enhance it later like this with scratch parts at home:
It should be better for fixing on the land, and better protecting the tent on top.
Wednesday, January 22, 2020
DIY Camping Lamp from useless stuff
I've found two pieces of lithium battery from old mobile phone.
A charging circuit board from a dead battery pack.

And a LED panel from a dead desktop light.

By adding a simple switch, a new camping light were born:
I made a paper box to cover the battery.
With this battery pack charging circuit, the charging speed is now faster.
I used a mobile phone mounting to fix it on a small tripod, and then to use it in actual scenario.
It has been over 8 hours and it's still up and kicking.
More than enough for overnight camping.
A charging circuit board from a dead battery pack.

And a LED panel from a dead desktop light.

By adding a simple switch, a new camping light were born:
I made a paper box to cover the battery.
With this battery pack charging circuit, the charging speed is now faster.
I used a mobile phone mounting to fix it on a small tripod, and then to use it in actual scenario.
It has been over 8 hours and it's still up and kicking.
More than enough for overnight camping.
Weight reduction, some DIY work
Drilled some holes around the handle of my pan, forget to record the weight before.
I believe around 2-3g and maybe 5g maximum? Anyway, it's easy and no harm to the functionality.
I am not those kind of ultra-light person, I just want more weight reduction for easier hiking, and maybe even bring more stuff or food.
--
I checked the original weight from the manufacturer, and they said 40g. So the weight reduction is 5g which means 12.5%.
Sunday, December 1, 2019
Fixing my Maple Titanium Stove
During a certain camping trip, I accidentally stepped on the stove and got one leg of the stove distorted. It ends up like this:
On close examination, I found the metal stub for fixing the location of the leg when extended, was distorted. That metal stub was extrusion molded.
So, I ended up drilling a hole through the stub!
See another leg for comparison:
In order to serve the function of the stub, I placed a M2 screw through it, it's a bit long but it works.
It's not perfect but it works. I shall look for replacement when there's a discount. I could live with this one certainly.
Friday, October 4, 2019
DIY 露營燈
其實係借屍還魂,三條屍體,變一盞營燈。
好多之前 (mini USB mini USB 年代),有個尿袋壞咗,拆咗個電路板出嚟,收埋無用。
另外又有一盞 LED 充電枱燈壞咗,拆咗個 LED panel 出嚟收埋無用。
最後,部山寨平板用咗四年瓜咗,拆咗兩塊鋰電出嚟。
就係咁,三合一。
第一個實驗,電路板夾其中一塊鋰電,充電成功,另外發現返電路板上啲 switch,其中一個竟然係較電壓,可以 5V USB 或者上到 9V 推其它野!另一個就係內置小 LED
焊埋另一塊鋰電落去。
用熱熔膠做少少固定,絕緣:
充電最熱都係咁既溫度,鋰電暖都唔暖:
電流頗低,舊式電路板吧,所以充得極慢:
充滿電有 4686mAh,開燈用 0.4A
即係用 10 小時都無問題了!
呢種改裝,應該所有舊手機電池都可以返生
--
This lamp has been modified as a lithium based battery pack for storing energy from my solar panel at home! And another camping lamp were made.
好多之前 (mini USB mini USB 年代),有個尿袋壞咗,拆咗個電路板出嚟,收埋無用。
另外又有一盞 LED 充電枱燈壞咗,拆咗個 LED panel 出嚟收埋無用。
最後,部山寨平板用咗四年瓜咗,拆咗兩塊鋰電出嚟。
就係咁,三合一。
第一個實驗,電路板夾其中一塊鋰電,充電成功,另外發現返電路板上啲 switch,其中一個竟然係較電壓,可以 5V USB 或者上到 9V 推其它野!另一個就係內置小 LED
焊埋另一塊鋰電落去。
用熱熔膠做少少固定,絕緣:
充電最熱都係咁既溫度,鋰電暖都唔暖:
電流頗低,舊式電路板吧,所以充得極慢:
充滿電有 4686mAh,開燈用 0.4A
即係用 10 小時都無問題了!
呢種改裝,應該所有舊手機電池都可以返生
--
This lamp has been modified as a lithium based battery pack for storing energy from my solar panel at home! And another camping lamp were made.
Sunday, July 8, 2018
Changing Toilet Seat 換厠所板 (淘寶)
其實之前換過一次,原身個厠所板係舊式,一方手就跌落嚟,又大聲,又容易爛,見淘寶有平貨,仲話係緩降型,即係放手唔會立即路落嚟,仲平過香港買好多,就買返嚟用,結果一用就幾年。
嗰塊確實係緩降版,但升都係緩升,意思係你拍返上去要用少少力,仲要 hold 多一陣,否則佢又會跌返落嚟,好煩。
過咗兩、三年後,佢仲唔緩降,但升卻繼續緩升,所以索性再換。
買廁板要度幾個呎吋,仲要知係方型、 U 型、還是 V 型,但其實好易分既唧,度就度以下既呎吋:
今次我買咗呢塊,都係幾十蚊,佢緩降但不緩升,一推上去放手就停低!咁之係嘛!
另外,後面有個快拆制,一推一拉就可以拆成件野出嚟,更方便徹底清潔!正!
嗰塊確實係緩降版,但升都係緩升,意思係你拍返上去要用少少力,仲要 hold 多一陣,否則佢又會跌返落嚟,好煩。
過咗兩、三年後,佢仲唔緩降,但升卻繼續緩升,所以索性再換。
買廁板要度幾個呎吋,仲要知係方型、 U 型、還是 V 型,但其實好易分既唧,度就度以下既呎吋:
今次我買咗呢塊,都係幾十蚊,佢緩降但不緩升,一推上去放手就停低!咁之係嘛!
另外,後面有個快拆制,一推一拉就可以拆成件野出嚟,更方便徹底清潔!正!
Wednesday, November 29, 2017
DIY alcohol stove 自制酒精爐
坊間已經有好多示範,咁我又有咩好講呢...
整到上面咁,大家都知,但原來之後都有啲學問既,現在分享吓啲細節。
一開始時,我求其是但圍住週圍鑽咗八個洞,諗住都無咩所謂喇,點知一點火,爆開解體。
原來點火時,溫度上升,氣壓提高,所以會分開。
所以呢,要鑽多幾個洞,大少少既洞都好,目的係減低氣壓。
當然,有另一種計設係中間全開,而唔係鑽小洞,咁樣氣壓就唔會因氣壓太大而解體。但開放式壓力不太夠,氣化唔全太全面。廠制既比較密封,用微細管作用吸酒精上去,又另當別論。氣化不良會出黃色火,甚至燒黑煲:
當氣孔數目同大少都配合得好既時候 (可以 trial and error),個爐就會易點著,又唔會爆開,又會燒得旺:
祝成功。
整到上面咁,大家都知,但原來之後都有啲學問既,現在分享吓啲細節。
一開始時,我求其是但圍住週圍鑽咗八個洞,諗住都無咩所謂喇,點知一點火,爆開解體。
原來點火時,溫度上升,氣壓提高,所以會分開。
所以呢,要鑽多幾個洞,大少少既洞都好,目的係減低氣壓。
當然,有另一種計設係中間全開,而唔係鑽小洞,咁樣氣壓就唔會因氣壓太大而解體。但開放式壓力不太夠,氣化唔全太全面。廠制既比較密封,用微細管作用吸酒精上去,又另當別論。氣化不良會出黃色火,甚至燒黑煲:
當氣孔數目同大少都配合得好既時候 (可以 trial and error),個爐就會易點著,又唔會爆開,又會燒得旺:
祝成功。
Wednesday, October 25, 2017
Friday, May 5, 2017
Replacing a broken screen for a tablet
It was dropped to the floor as my daughter said, less than 3 months new... The SD card slot was damaged and the card inside was bend and broken too.
Before the replacement.
The seller was nice enough to request for an image of the back of the tablet, so as to ensure everything works well.
Make sure that it could be turned on...
The disassembly is easy, much easier than replacing the screen of a mobile phone.
Pulled out the components... the connectors were quite big and so it's not difficult at all.
Q.E.D.
taobao is a great source, and to my surprise, such a big screen is actually quite cheap, cheaper than most mobile phone screen!
Before the replacement.
The seller was nice enough to request for an image of the back of the tablet, so as to ensure everything works well.
Make sure that it could be turned on...
The disassembly is easy, much easier than replacing the screen of a mobile phone.
Pulled out the components... the connectors were quite big and so it's not difficult at all.
Q.E.D.
Friday, January 20, 2017
Installing a pickup for my 17" ukulele
Ukulele is so small than you could take it anywhere with you. With my 17" ukulele, this is even more true but then the voice is relatively low for this little guy, and a separate tuner will lower the portability, too. So, I want to install a pickup with built-in tuner. After some searching, this one seems to fit the bill nicely.
As you could see above, this tuner has a 1:1 paper template for you to ease the cutting process. Anyway, let's start with the simplest step first.
Reduce the tension of the strings, and then take the saddle out.
Drill a hole to put the pickup under the saddle. One should file down the saddle to compensate for the added thickness... I didn't do it at first, and we could always do that later if the string is too high.
Since I don't have the proper tool for cutting wood, I just used the same hand drill to drill some holes along the cutting line... and then use a simple cutter to cut carefully.
Not too bad? Notice that we you decide where to put the pickup module, check the inside of the Ukulele to see if there's reinforcement structures inside. Avoid them if possible.
Finally, drill where you should put the plug it, and this is relatively simple. I used a thread to help me pull the socket out from inside.
Install the pickup panel, and this is the hardest part.
A complete success...
As you could see above, this tuner has a 1:1 paper template for you to ease the cutting process. Anyway, let's start with the simplest step first.
Reduce the tension of the strings, and then take the saddle out.
Drill a hole to put the pickup under the saddle. One should file down the saddle to compensate for the added thickness... I didn't do it at first, and we could always do that later if the string is too high.
Since I don't have the proper tool for cutting wood, I just used the same hand drill to drill some holes along the cutting line... and then use a simple cutter to cut carefully.
Not too bad? Notice that we you decide where to put the pickup module, check the inside of the Ukulele to see if there's reinforcement structures inside. Avoid them if possible.
Finally, drill where you should put the plug it, and this is relatively simple. I used a thread to help me pull the socket out from inside.
Install the pickup panel, and this is the hardest part.
A complete success...
Subscribe to:
Posts (Atom)